A curves Adjustment Layer in Photoshop is very useful if you want to bump up the image subtly and quickly without too much effort and when you have little time. It can be applied to most images and is intriguing at the effects you can get without trying too hard. Also is it very easy to do.
I will be using this free stock image.
The image after processing.
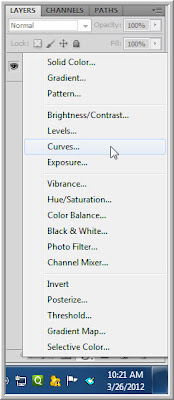
Step 1 :There is only the Background layer in the Layers palette. Click the Adjustment Layer button.
Step 2 : Click on Curves from the pop up menu.
The Curves Adjustment Layer comes up. In the Curves dialogue box you will find that beside the RGB channel there are Red, Green and Blue channels.
Step 3 : Click first on the Red channel. Note the diagonal inside.
Step 4 : Click two points on the diagonal at the top right and bottom left as shown, then pull the upper point up slightly and the lower point down slightly as shown.
Step 5 : Click the Green channel and click two points on the diagonal -- one at top right and the other at left bottom. Drag the upper point up slightly and the lower point down a bit. It should form a gentle S curve, just as we did in the Red channel.
Step 6 : Lastly click the Blue channel. This time do the opposite with the two points. Drag the upper point down slightly and push up the lower point a bit.
Step 7 : Click the RGB channel.
Step 8 : Drag the diagonal up slightly.
ALT+CLICK the Background Layer eye icon to see the before and after effects.
Step 9 : Lower the Opacity of the Curves Adjustment Layer just a tad. I have lowered it to 85%.
The finished image.


Post a Comment